
Ever dreamt of sliding into a cozy pair of ballet slippers that you’ve crafted with your own hands? Well, you’re in luck! Whether you’re a beginner with a hook or a seasoned crochet whiz, this guide is your go-to resource for the perfect ballet slippers free crochet pattern. We’re talking all the yarny goodness—step-by-step instructions, customization tips, troubleshooting hacks, and even a few fun facts along the way. Not only will you save money, but you’ll also end up with handmade slippers that fit like a dream. So grab your hooks and let’s stitch our way to some seriously stylish comfort.
Introduction to Crochet Ballet Slippers
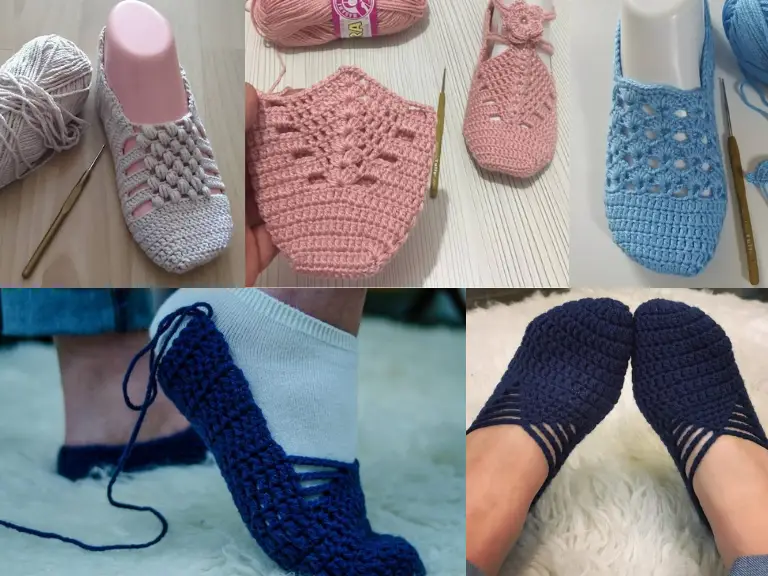
Overview of Crochet Ballet Slippers
Crochet ballet slippers are more than just indoor footwear—they’re a blend of comfort, style, and creativity. With a snug fit and elegant look, they’ve become a favorite among DIY lovers and crochet fans alike. These slippers are soft, flexible, and perfect for lounging at home or gifting to loved ones. Plus, they’re a delightful project to whip up in a weekend!
Benefits of Crocheting Your Own Ballet Slippers
There’s a certain joy in wearing something you made with your own two hands, right? Creating your own handmade ballet slippers allows you to pick the perfect color, yarn texture, and size tailored just for you or the lucky recipient. Not to mention, crocheting is a calming hobby that boosts mindfulness while saving you a few bucks. Unlike store-bought versions, DIY crochet slippers let you control every stitch, ensuring a perfect fit and personalized finish.
Stay tuned—because in Part 2, we’re diving into the tools and materials you’ll need to get started on your slipper-making journey!
Tools and Materials Needed
Essential Supplies for the Pattern
To start off on the right foot (literally!), you’ll need a few key tools. Grab a crochet hook—typically size 4mm (G) or 5mm (H) works well depending on your tension and yarn weight. You’ll also need stitch markers, a yarn needle for weaving in ends, and of course, soft worsted weight yarn—a popular choice for comfy, wearable slippers.
Yarn Recommendations
The right yarn can make or break your project. Opt for something machine washable with a soft but sturdy texture. Acrylic or cotton blends work great because they offer durability and comfort. Brands like Red Heart Soft or Lion Brand’s Vanna’s Choice are beloved in the crochet community for their consistency and color range.
Optional Add-Ons
Want to go the extra mile? Add non-slip soles using fabric paint or pre-cut rubber soles for safety. You can also embellish your slippers with crocheted flowers, bows, or even buttons. This is your moment to shine with flair!
Starting the Pattern – Slipper Base
Understanding the Slipper Construction
Before we loop a single stitch, it’s important to visualize how the crochet ballet slipper comes together. Think of it as a cozy sock that hugs your foot. Most patterns begin at the toe or sole and work their way up toward the ankle. For this guide, we’ll start from the sole and build our way upward. This ensures a more form-fitting shape and gives your slippers a polished, professional look.
Basic Crochet Stitches to Know
You don’t need to be a master of all stitches—just a few basics will do the trick. Here’s what you’ll use most often:
- Chain stitch (ch) – This is your foundation. It sets the length and width of your work.
- Single crochet (sc) – Tight and neat, this stitch is ideal for the base.
- Half double crochet (hdc) – A bit taller than single crochet and gives a softer texture.
- Slip stitch (sl st) – Used to join rounds or finish off cleanly.
If you’re unfamiliar with any of these, check out AllFreeCrochet’s stitch guide – their visuals are super helpful for beginners!
Creating the Sole – Step-by-Step
- Foundation Chain: Start by chaining around 10–12 stitches (adjust depending on your shoe size).
- First Round: Work single crochets into each chain across, then turn your work and crochet into the opposite side of the chain. This creates an oval shape.
- Shaping the Sole: Continue working in rounds, increasing at both ends (usually 2 sc in each end stitch) to widen the base. Repeat for 4–6 rounds until you achieve the desired sole length and width.
Pro Tip: Use stitch markers to mark the ends of your rows so your shape stays symmetrical.
Measuring for the Perfect Fit
It’s super important to measure your foot as you go. Lay the growing sole against your foot or trace outline on paper. Aim for a snug but not tight fit—the slipper will stretch slightly with wear. If needed, add or reduce a row to accommodate your size.
Building the Slipper Body
Working the Sides and Instep
Now that you’ve got your sole stitched and shaped, it’s time to work upward—literally. The body of your ballet slipper adds that snug, sock-like fit that hugs your foot just right.
To begin the upper:
- Attach Yarn: Join your yarn at the heel or side of the sole using a slip stitch.
- Crochet in the Round: Work single or half double crochets around the edge. This creates the first side row.
- Shape the Instep: As you build rows, begin decreasing around the toe area to give it that classic ballet flat contour. Think of this part as the shaping zone.
Hot tip: Always count your stitches! Uneven stitch counts can warp the shape, and we don’t want wobbly slippers, do we?
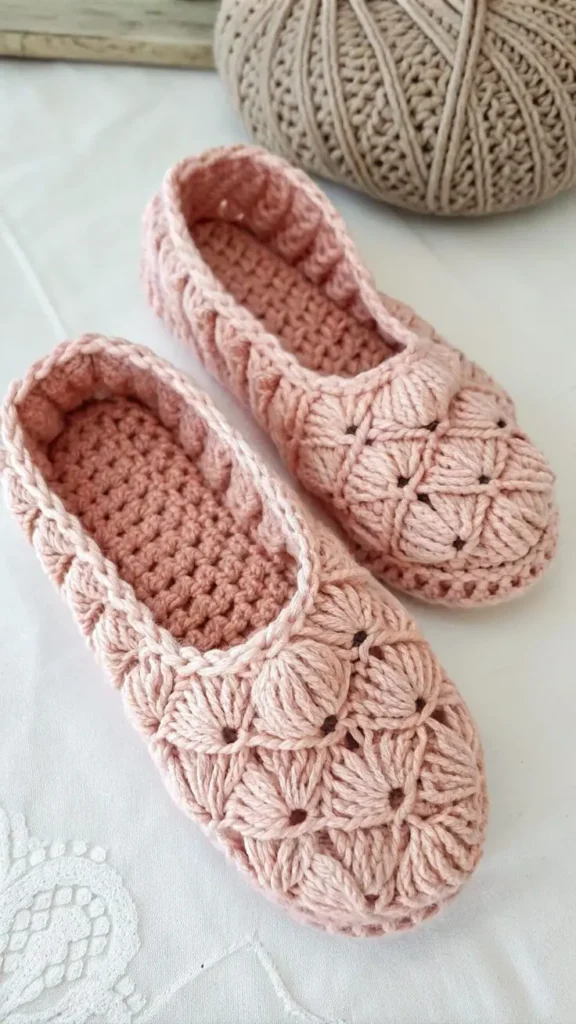
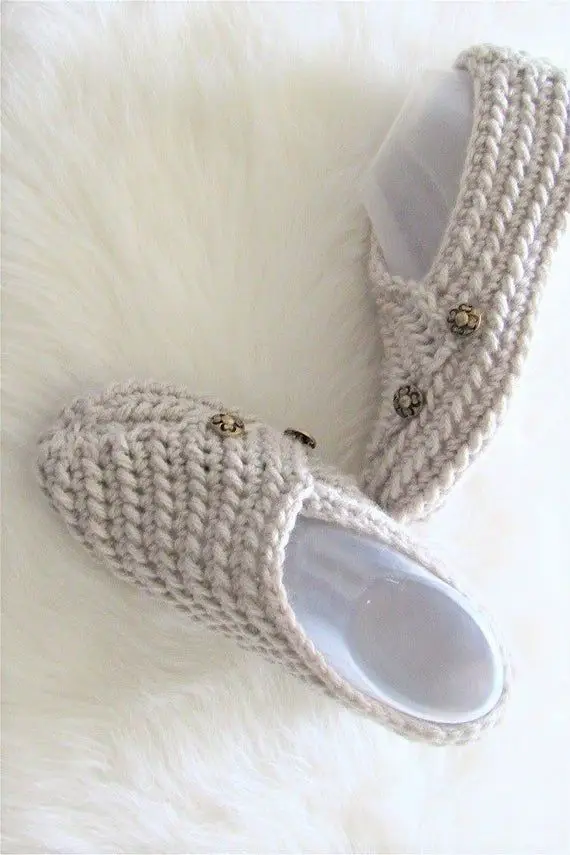
Adding Style and Structure
Here’s where creativity kicks in. Want a daintier look? Use shell stitches across the top. Going for extra coziness? Add a few rows of ribbed stitches around the heel for extra grip.
Also, consider using a contrasting yarn color on the top edge—it gives a pop of color and a professionally finished look.
Need a visual reference? Yarnspirations’ crochet tutorials break down shaping techniques with easy-to-follow videos and diagrams. Super handy if you’re more of a visual learner.
Customization Tips for Fit
Everyone’s feet are different, so don’t stress if the standard size doesn’t feel just right. You can:
- Add more rounds around the heel if it’s too short.
- Decrease faster at the toe to narrow the shape.
- Try the slipper on after every few rows—yes, it’s that flexible!
Closure Styles and Decorative Touches
Exploring Closure Options
Alright, now that your slipper body is stitched to perfection, let’s talk closures. These little additions not only help your slippers stay snug but also add that extra oomph to the final look.
You can go with:
- Simple slip-on style – clean and classic.
- Elastic bands – stitched across the instep for added grip and ballet vibes.
- Straps with buttons – a cute Mary Jane twist that’s as functional as it is fashionable.
- Crochet ties or ribbons – perfect for those who love a dainty, ballerina-inspired finish.
Each style offers something different. If your slippers are for kiddos or active wear around the house, consider a strap or tie to keep them secure. For lounging? Slip-ons are your best bet.
Adding a Personal Touch
Here comes the fun part—decorating! Customization is what takes your crochet from basic to “wow, you MADE those?”
Some embellishment ideas:
- Crocheted bows or flowers stitched on the toes
- Edging with contrasting yarn like picot or shell trim
- Cute appliqués like hearts or stars for a playful finish
Feel free to experiment! This is your chance to get creative and let your personality shine through your stitches.
For even more inspiration, check out LoveCrafts’ gallery of crochet project ideas. It’s full of patterns and finishing tips from makers just like you.
Final Assembly and Finishing Touches
Assembling Your Slippers Like a Pro
So, your pieces are ready—it’s time to bring it all together! Final assembly is where your slippers really come to life. Don’t worry, it’s easier than it sounds.
- Seam the back heel: Fold your slipper in half with the right sides facing inward. Using a yarn needle or slip stitch, join the back of the heel. This creates that neat, rounded finish at the back.
- Attach the sole (if separate): Line up the edges and whipstitch or single crochet around the entire base, keeping it smooth and even.
- Flip and fluff: Turn your work right side out and smooth the edges with your hands to shape them perfectly.
Want a more professional finish? Consider blocking your slippers. Just dampen them slightly, shape them, and let them dry overnight—voilà, a crisp look and better fit.
Securing Your Add-Ons
If you added bows, straps, or embellishments, now’s the time to double-check everything’s sewn on tight. You definitely don’t want to lose a cute button mid-stretch! Reinforce any decorative elements with a few extra stitches, especially if they’ll be worn often.
Care Tips for Long-Lasting Use
Taking care of your crocheted ballet slippers is key to keeping them fresh and cozy.
- Hand wash or use the delicate cycle with cold water.
- Air dry flat to maintain their shape.
- Avoid wringing out—gently press with a towel to remove moisture.
For a deeper guide on washing handmade crochet items, check out Craftsy’s care tips for crochet projects—super handy, especially if you’re gifting!
FAQs
1. What is the best yarn for crochet ballet slippers?
The best yarn for crochet ballet slippers is a soft yet sturdy worsted-weight yarn. Look for washable fibers like acrylic, cotton, or blends that offer comfort, flexibility, and durability.
2. Can beginners crochet ballet slippers?
Absolutely! Many ballet slipper crochet patterns are beginner-friendly and use simple stitches like single crochet and double crochet. With a bit of practice, even a newbie can whip up a cozy pair in no time.
3. How do I make crochet slippers non-slip?
To make your slippers safe on smooth surfaces, apply fabric puff paint to the soles or sew on pre-cut non-slip soles. This adds grip without compromising comfort.
4. How long does it take to crochet a pair of slippers?
It typically takes between 2 to 4 hours to complete a pair, depending on your speed and the complexity of the pattern. Simpler patterns are quicker, making them perfect for weekend projects.
5. Can I adjust the pattern for different sizes?
Yes, most free ballet slipper patterns include size adjustments. You can tweak hook size, stitch count, or yarn thickness to fit children, adults, or custom foot sizes.
6. How do I wash crochet slippers?
Hand washing is ideal, but many yarns are machine washable on a gentle cycle. Always air dry your crochet slippers flat to help them maintain their shape and softness.
Conclusion
And there you have it—a complete guide to making your own ballet slippers using a free crochet pattern! Whether you’re stitching up your very first pair or adding another to your handmade collection, there’s something undeniably rewarding about crafting slippers that are both comfortable and chic. With just a hook, some yarn, and a dash of creativity, you can turn simple strands into cozy elegance for your feet.
So, don’t stop here—experiment with colors, textures, or even add your own flair. The more you crochet, the more confident you’ll become. Who knows? Your next pair might just be a handmade gift that someone treasures forever.
Happy hooking, and may your slippers always be soft, snug, and stitched with love!